
執筆: M.M
執筆バージョン: Unreal Engine 4.23
はじめに
昨今、自動車の自動運転についてかなり認知が広がっているかと思います。その自動運転の安全性を保つためにもシミュレーションを用いた開発が欠かせません。そんななか、自動運転のシミュレーションを開発する方法の一つとして、MATLABとUE4を連携して行う形があります。UE4を用いるため、ゲーム開発者等であればとっつきやすいと感じて調べる方も多いのではないでしょうか。
しかし、リファレンスが少なく、開発初心者にとっては、難しいだろうとも思われます。そこで今回、この二つのソフトを簡易的に連携する方法を紹介していきます。
この記事の内容
今回の記事は長いので2つに分けてお送りしていきます。
1. UE4のプロジェクトの準備
2. Simulinkのサンプルモデル作成
次回はUE4をMATLABから立ち上げる方法からUE4側のマップ設定について、そして実際に動かして確認していきます。
ファイルを用意しよう
今回必要なファイルは6種類です。
1~5がインストールされていない場合は行ってから読んでください。
- Unreal Engine 4.23
- VisualStudio2017
- MATLAB
- Simulink(MATLABのアドオン)
- Vehicle Dynamics Block Set(MATLABのアドオン)
- Vehicle Dynamics Blockset Interface for Unreal Engine 4 Projects
UE4のプロジェクトの準備
「Vehicle Dynamics Block Set Interface for Unreal Engine 4 Projects」を上記のURLからダウンロードをしてMATLABにアドオンを追加してください。追加しましたらMATLABを起動し「新規スクリプト」を押下してエディターを立ち上げます。
%% STEP1
% Specify the location of the support package project files and a local folder destination
% Note:  Only one path is supported. Select latest download path.
dest_root = "C:\Local";
src_root = fullfile(matlabshared.supportpkg.getSupportPackageRoot, ...
    "toolbox", "shared", "sim3dprojects", "automotive");

%% STEP2
% Specify the location of the Unreal Engine installation.
ueInstFolder = "C:\Program Files\Epic Games\UE_4.23";

%% STEP3
% Copy the MathWorksSimulation plugin to the Unreal Engine plugin folder.
mwPluginName = "MathWorksSimulation";
mwPluginFolder = fullfile(src_root, "PluginResources", "UE423"); % choose UE version
uePluginFolder = fullfile(ueInstFolder, "Engine", "Plugins");
uePluginDst = fullfile(uePluginFolder, "Marketplace", "MathWorks");

cd(uePluginFolder)
foundPlugins = dir("**/" + mwPluginName + ".uplugin");

if ~isempty(foundPlugins)
    numPlugins = size(foundPlugins, 1);
    msg2 = cell(1, numPlugins);
    pluginCell = struct2cell(foundPlugins);

    msg1 = "Plugin(s) already exist here:" + newline + newline;
    for n = 1:numPlugins
        msg2{n} = "    " + pluginCell{2,n} + newline;
    end
    msg3 = newline + "Please remove plugin folder(s) and try again.";
    msg  = msg1 + msg2 + msg3;
    warning(msg);
else
    copyfile(mwPluginFolder, uePluginDst);
    disp("Successfully copied MathWorksSimulation plugin to UE4 engine plugins!")
end

%% STEP4
% Copy the support package folder that contains the AutoVrtlEnv.uproject
% files to the local folder destination.
projFolderName = "AutoVrtlEnv";
projSrcFolder = fullfile(src_root, projFolderName);
projDstFolder = fullfile(dest_root, projFolderName);
if ~exist(projDstFolder, "dir")
    copyfile(projSrcFolder, projDstFolder);
end
入力が終わったらパブリッシュを押下して保存を選択。任意の名前でファイルを保存してください。
保存したらエディタを閉じて、以下の画像の通りに実行してください。
①MATLABの「ホーム」→「レイアウト」→「現在のフォルダ」を選択
②左に先ほど保存したファイルがあるので、コマンドウィンドウにドラック&ドロップ

これでUE4にVehicleDynamicsBlocksetのプラグインを追加しました。これを使ってUE4とMATLABの連携を行っていきます。
作成したらUE4のプロジェクトを立ち上げます。立ち上げましたらプラグインの「Installed」から「MathWorksInterface」を選択してください。

選択したら一旦UE4を閉じます。
Simulinkのサンプルモデル作成
次にMATLAB側でUE4の車を動かすプロジェクトを作成していきます。
MATLABからSimlinkボタンを押下してください。

次にSimulinkのスタートページが表示されるので、空のモデルを選択してください。

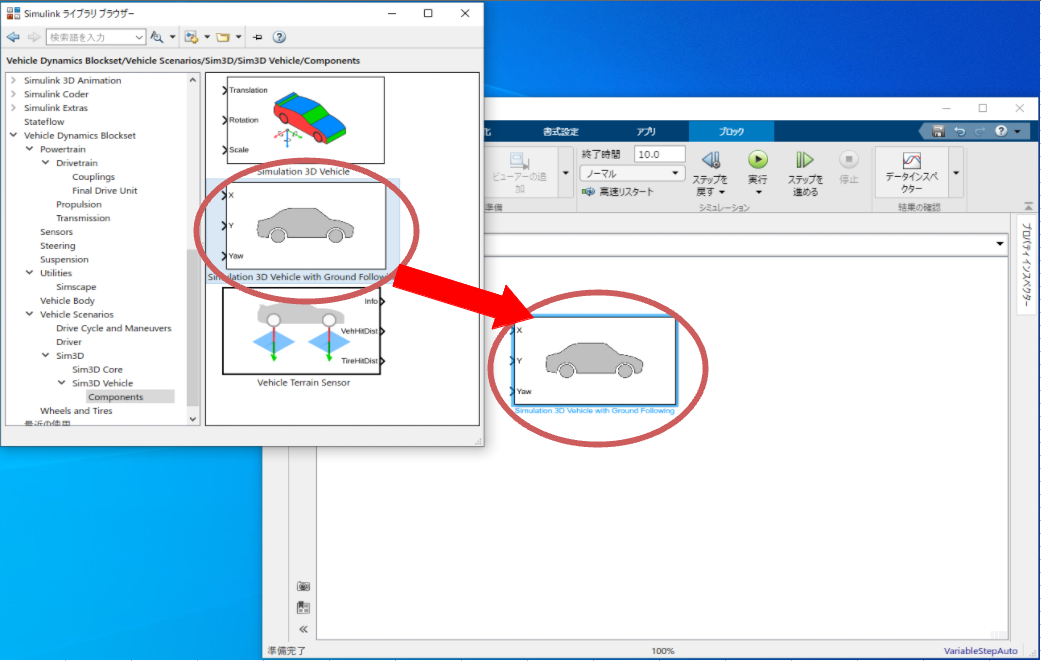
Simulinkのウィンドウが表示されるのでライブラリブラウザーを押下してください。

表示されたライブラリブラウザからSimulinkのウィンドウへ、以下の全部を検索してD&Dしてください。
・「Simulation 3D Vehicle with Ground Following」
・「Simulation 3D Scene Configuration」
・「Simulation 3D Camera Get」
・「To Video Display」
・「Constant」を2つ
・「Ramp」
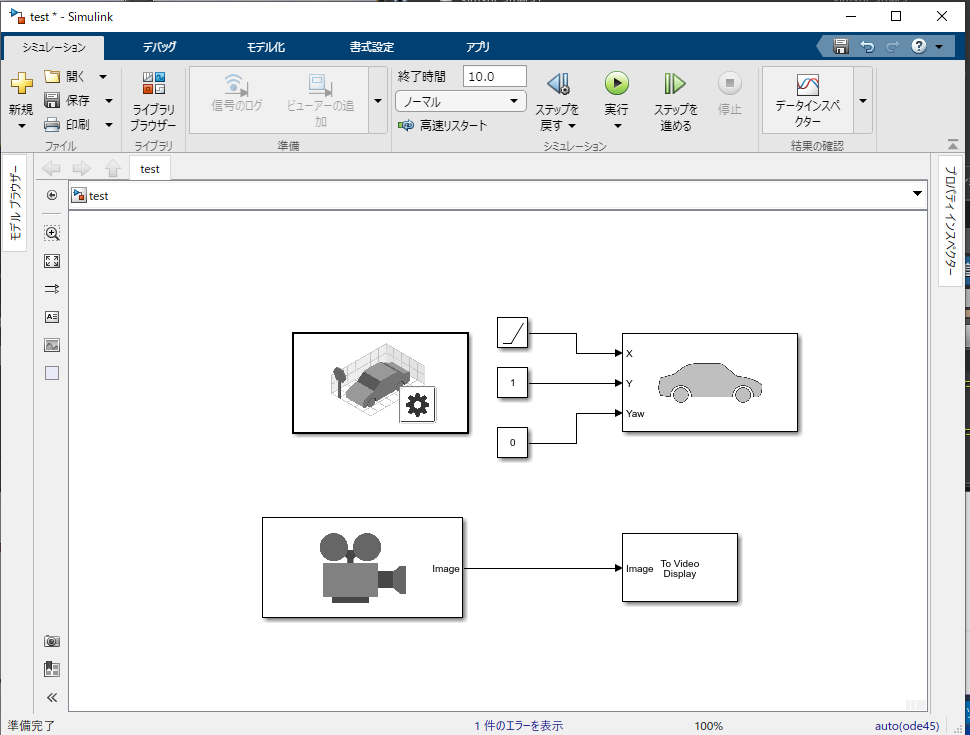
配置したブロックを下図の通りに線をつなげてください。
「Simulation 3D Scene Configuration」をダブルクリックして詳細ウィンドウを開きます。開いたら以下の設定を行ってください。
①SceneSourceを「UnrealEditor」に選択
②Project:をUE4のファイル指定(拡張子.uproject)
③適用をクリック
④OKをクリックして詳細ウィンドウを閉じる

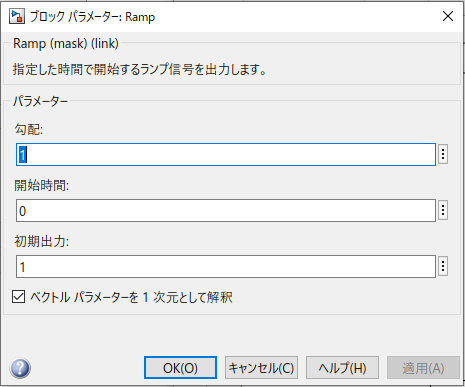
Rampの中身を以下のように設定して適応ボタンを押した後OKを押下します。
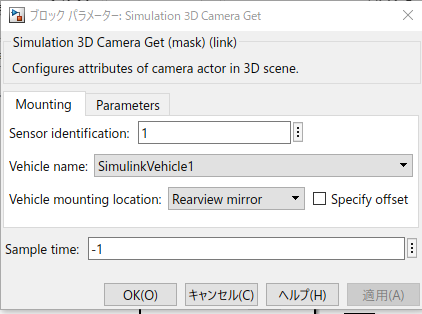
Simulation 3D Camera Getをダブルクリックして「Vehicle mounting location」を「Rearview mirror」に選択します。選択したら適用を押下した後OKを押下してください。
これでSimulinkの設定は終了です。任意の名前で保存をしてください。
まとめ
今回はMATLAB側のサンプルモデルを作成するところまでを紹介しました。このサンプルモデルは一定速度で前に進むだけのモデルとなります。他にもSimulinkには様々なライブラリがありますので、ハンドルを実装する等に挑戦してみてはいかがでしょうか。次回はUE4側の設定から実際に動かしたところまでの説明を行っていきます。